1. Based on the size of the glans penis, use the measuring ring on the penis (without retracting the foreskin) to pass through the penis and select a matching disposable window circumcision stapler (the size is marked on the ring). If the penis size is between two sizes, the larger size should be used.
2. Perform routine disinfection and draping of the surgical field, and administer local anesthesia or other effective anesthesia.
3. For those with foreskin adhesions, the adhesions must be separated; for those with phimosis, an incision can be made on the dorsal side of the frenulum (note that the incision line should not extend beyond the suture site) to allow for the insertion of a bell-shaped glans socket.
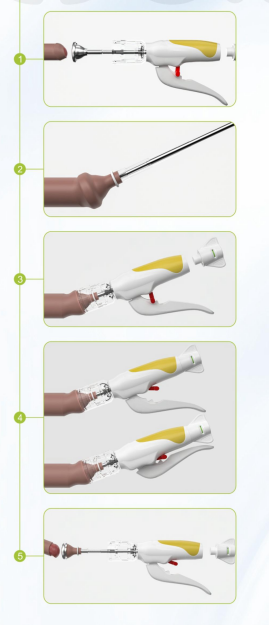
4. Unscrew the adjustment knob, remove the bell-shaped glans base from the instrument, and lift the foreskin with hemostatic forceps (slightly tilt the foreskin towards the outer layer at the junction of the inner and outer layers at the frenulum, and slightly tilt it towards the inner layer at other parts). Place the bell-shaped glans base inside the foreskin and onto the glans, covering the surface of the bell-shaped glans base with the foreskin. Tighten the inner layer and adjust the outer layer to the pre-cutting position, keeping the plane of the bell-shaped glans base parallel to the plane of the coronal sulcus as much as possible. At this time, pay attention to gently pushing the glans into the bell-shaped glans base at the frenulum to ensure the frenulum length, and then fix the foreskin to the pull rod with a cable tie or silk thread. Hold the penis and bell-shaped glans base with your left hand, and simultaneously hold the suture device. With your right hand, attach the adjustment knob and tighten it. When the end face of the pull rod is flush with the end face of the adjustment knob, it indicates that the knob is in place, and the window of the adjustment knob will also be green. The operator can observe and adjust the length and position of the foreskin through the viewing window on the product head.
5. Loosen the safety buckle, press down firmly on the handle, hold the handle tightly for 30 seconds, then hold for another 20 seconds (to prevent bleeding, you can simultaneously wrap the surgical area with dry gauze during this time), then release and assist in opening the handle. Rotate the adjustment knob counterclockwise until it retracts about 5-7mm, then push the bell-shaped glans seat forward through the knob to separate the cutting area from the instrument. At the same time, observe whether it is completely cut off. If a small amount is not cut off, it can be trimmed with scissors or the tip of a blade. Under direct vision, slowly and gently twist the circumcision stapler along with the cut foreskin out. Wrap it with dry gauze (if the wound with free adhesions is large, wrap it with Vaseline gauze first), then apply appropriate pressure with a self-adhesive elastic bandage (it is recommended to be loose inside and tight outside). After 2-3 hours, the outer elastic bandage can be removed, leaving the inner layer intact. After 48 hours, all bandages can be removed.